Thursday, September 29, 2011

Building Binary from multiple C files: Using custom header, accessing variables across multiple .c files

One of my friend requested me to add basic stuff related to C programming. Initially when I started coding I was skeptical using custom header files, using same variable in different .c files and building binary from multiple C files. This post probably clears all those doubts.

Below shapshot shows content in header file (praveen.h) and code in different C files (sharedvar1.c, sharedvar2.c).

Below snapshot shows how to compile multiple C files to create a single binary and also output of the program.


Also we have learned how to access single variable across multiple files.
Hope this might have helped from someone somewhere :) !!!

Thursday, September 8, 2011

Malicious PDF: Portable Document Files Compresion/Encoding/Obfuscation

Malicious PDF's has increased manifold which are used to infect computers with Malware of execute code when PDF files are opened. We will see various ways how javascript embedded within PDF's can be compressed or encoded to evade detection by IDS/IPS and Anti Virus. Normally many PDF Parsers crash while analyzing the malicious/malformed file but Adobe reader successfully opens the file which leads to infection.

Below is the malicious PDF file viewed in text editor.


PDF Parsers might have issues in analyzing following abnormal files:
1. Portable Document File Format does not strictly abide to its specification.
2. PDF Version might be malformed (NULL value, incomplete value etc) (can see in above pic)
3. May not contain endobj or endstream (atleast one string should be present within an object)
4. May not contain xref table
5. Names may be Encoded (/JavaScript as /J#61vaScript).
6. No %%EOF header
7. There might be multiple %%EOF headers or trailer’s  indicating incremental updates.
8. PDF embedded within other PDF (same object numbers in a single file).
9. Different types of Evasions/ Encoding can be found at

Different Encoding/Compressions Filter types are
/FlateDecode
/ASCIIHexDecode
/ASCII85Decode
/JBIG2Decode
/LZWDecode
/RunLengthDecode
/SCIIHexDecode, 
/CCITTFaxDecode
/DCTDecode
/JPXDecode
This might not be the full list of Filters (not sure) .

Below snapshot shows highly obfuscated  PDF file


Good articles related to PDF's can be found at

For quick analysis of a PDF file you can upload to
http://wepawet.cs.ucsb.edu/

Live malicious PDF files can be found at
http://filex.jeek.org/archive_PDF.zip
Please do not open files in the archive with any of the PDF readers.

Following articles might be of your interest
http://darshanams.blogspot.in/2012/05/cain-and-abel-password-cracking.html
http://darshanams.blogspot.in/2010/09/forensics-1-extracting-image.html
http://darshanams.blogspot.in/2011/05/snort-logging-alerts-to-syslog-server.html

Comments are most welcome :) !!!

Saturday, July 23, 2011

Message Queues- An Introduction

Processes can exchange messages using Message Queues. Sending process message is saved in a queue, Receiving process reads the message from queue.

Below program sends message to queue.


Below snapshot is the code for receiving process which reads message from queue.


Compiling msg_snd.c:
#gcc msg_snd.c -o msg_snd

Compiling msg_recv.c:
#gcc msg_recv.c -o msg_recv

Output:
Snapshot below

To check the state of Message Queues run ipcs -q command.

Pointers:
1. Include headers
         sys/types.h
         sys/ipc.h
         sys/msg.h
2.  msgq_id (message id) is an arbitrary number of type int generated by msgget() which should be passed as parameter/argument to msgsnd(), msgrcv()
msgq_id can also be generated using ftok()
3. key (key_t is of type int) is another arbitrary number. Same key value must be passed as parameter/argument to msgsnd() and msgrcv().
4. Message Type (mtype) is another arbitrary number. Same mtype should be passed as parameter/argument to msgsnd(), msgrcv()
5. mtype is passed as struct mbuf argument to msgsnd(), and long type to msgrcv()
6. for man page of any API run man command e.g.
        man 2 msgsnd
        man ipcs

This is pretty high-level overview of Message Queues.
Feel free to drop a comment.

Other articles on C language
http://darshanams.blogspot.in/2011/09/building-single-binary-from-multiple-c.html
http://darshanams.blogspot.in/2012/01/endianness-different-processors.html

Saturday, May 7, 2011

Snort: Logging Alerts to Syslog Server

Life is so busy. It's been pretty long since my last post. Well coming to the post :) ...

We will get into configuration details of Syslog and Snort to log our alerts into Kiwi Syslog Server.

Add the following line to Snort configuration file
 output alert_syslog: host=172.16.232.161:514, LOG_AUTH LOG_ALERT
Snort configuration file can be found at
                 /etc/snort/snort.conf
In my case Snort is running on 3.3.3.9 on eth1 and eth0 is assigned with 172.16.232.171 IP which talks with Syslog Server.

Following command is used to run Snort
 snort -c /etc/snort/snort.conf -i eth1
-c    provide snort configuration file path
-i     interface on which Snort is sniffing the traffic

Output shown in above figure is seen when the Snort command is successful.

Modify syslog configuration file
                 /etc/rsyslog.conf
by adding line
*.*                                                     @172.16.232.161:514
where 172.16.232.161 is the Syslog Server IP Address and UDP/514 is the port on which it is listening.
*.* says log all types of alerts.

To make sure that Syslog Server is running on UDP/514 port uncomment below lines in the configuration file
$ModLoad imudp.so
$UDPServerRun 514
Above lines are commented by default.

Once the modified configuration is saved restart the Syslog daemon
 /etc/rc.d/init.d/rsyslog restart

Make sure to stop firewall or add rule to allow traffic on UDP/514 port.

When we send malicious payload or replay PCAP with malicious traffic on the interface where snort is running, we can see alerts in our Kiwi Syslog Server which is installed on Windows XP machine (172.16.232.161).

Below is the Packet Capture format when Snort sends alerts to Syslog Server.

Refer Snort Manual and/or Snort FAQ for further details.

For Snort Preprocessors you can refer below link
http://darshanams.blogspot.in/2010/06/snort-preprocessors-and-alerts.html

Hope this will help someone somewhere.

Following articles might be of your interest
http://darshanams.blogspot.in/2012/05/cain-and-abel-password-cracking.html
http://darshanams.blogspot.in/2011/09/portable-document-files.html
http://darshanams.blogspot.in/2010/09/forensics-1-extracting-image.html

Enjoy :) !!!

Monday, November 29, 2010

Wireshark: Remote Packet Capture, bit of Security

Wireshark/Ethereal is one of the best open source tools we have. I don't think there will be individuals working in Networking domain (especially into IDS/IPS, Firewalls etc.) and don't know Wireshark/tcpdump. Please I wanna see u guys/gals ;-)

There are many features available in Wireshark, we are going to focus on remote packet capture.

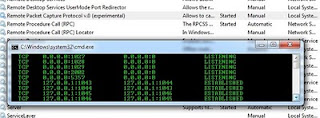
Need Wireshark Version 1.4.2 with the new WinPcap available inbuilt with it. Install this on bothe the machines, where you are going to take capture (client) and on the machine where we want to sniff the traffic(server). On Server we need to start "Remote Packet Capture Protocol v.0 (experimental)" service, which will open TCP Port 2002 on the Server.


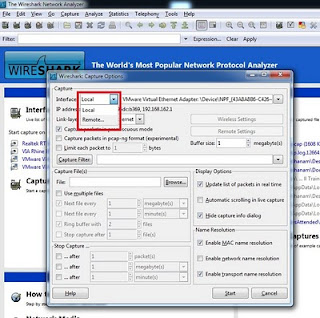
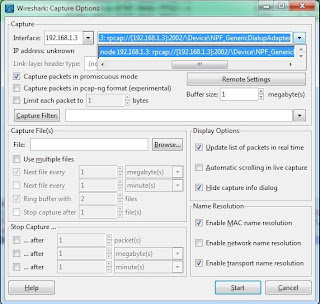
Once the service is started, run wireshark on the Client machine. Goto Capture->Options. Clicking Options will pop up a window shown below.


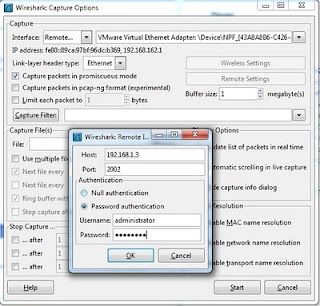
In this window we can see Interface field on the top left corner which has drop down menu, from this menu select "Remote" option which will pop one more window asking for details like Host: (Enter IP Address), Port:, enter 2002 here.

Authentication:

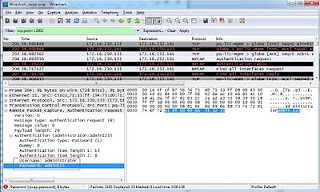
For logging onto Server to take packet capture we need to successfully authenticate to server.


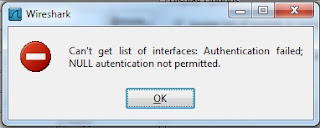
Under Authentication, opt for Password authentication, Null authentication is not supported which might throw below error.


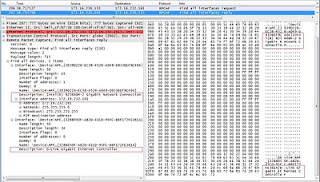
Once the Authentication is successfull you can select one of the interfaces on the Server if there are multiple for sniffing.


Security:

Well, this is one of the awesome features Wireshark has given to its users. But the downside is, log in credentials traversing the network in clear text. Atleast they would have provided basic encryption/ encoding techniques to hide password.


Exposing all the interfaces of a multi homed Server, it's IP Addresses etc.


Hope this post and feature will be very helpful for you :-)

Following articles might be of your interest
http://darshanams.blogspot.in/2012/05/cain-and-abel-password-cracking.html
http://darshanams.blogspot.in/2011/09/portable-document-files.html
http://darshanams.blogspot.in/2010/09/forensics-1-extracting-image.html
http://darshanams.blogspot.in/2011/05/snort-logging-alerts-to-syslog-server.html

Saturday, October 2, 2010

Forensics 2: Identifying File System and Extracting it

The advantages of analyzing disk images are that the investigators can:
a) preserve the digital crime-scene
b) obtain the information in slack space
c) access unallocated space, free space, and used space
d) recover file fragments, hidden or deleted files and directories
e) view the partition structure and
f) get date-stamp and ownership of files and folders.

Here we will try to concentrate on extracting the File System if any from the image for analysis available from the Crime Scene.

Lets check the md5 hash of the image under analysis for integrity purposes. The md5 hash algorithm produces a 128 bit “fingerprint” of a file, also known as a message digest. To view the md5 hash value assigned to a given file, the md5sum utility can be used.Lets check the file type of the image under analysis by using file command. The file command works by testing “arguments” within a file, and will then classify the file as whichever file type the file command sees fit. We see from the output of the file command that the image file contains an x86 boot sector. The boot sector of a computer is a primary starting point for an OS. The operating system will start at the boot loader, and the machine will read the first 512 bytes of the disk, which is known as the boot sector. The first 512 Bytes (boot sector) will be loaded into memory and will then be executed. This will initiate the boot process.

The x86 boot sector type message was obtained because the magic number 0xAA55 value is located at the 0x1FE offset within the image; defined in the file “/usr/share/file/magic” which is used by file command.

Determining the File System type of the Image
Lets run mmls utility to determine the File System type of the given image extracted by using dd command as shown below.-t Specify the media management type (dos, mac, bsd etc)

We see above that the NTFS (New Technology File System) partition begins at sector 63 (to see this look at the last column in the row where it says NTFS (0x07). Now look to the left in the start column of the row NTFS and we can see the value 0000000063). So for all the Sleuth Kit commands we need to specify an offset of 63 if the file used is raw image.
MMLS is a forensics utility that query’s an image file, and prints the partition tables and disk labels. This command is very useful when attempting to determine at which sector a partition begins and ends. We see that there is a NTFS file system on this image. We use the –t dos switch to tell mmls to utilize a dos based architecture for the file system.


File system is extracted using dd.exe command. Input file is the raw image collected from the machine which is under forensic investigation. Block size used to extract File system is 512 bytes and skipped 62 sectors because our NTFS File System is starting after those sectors.

Thus extracted File System image can be mounted by using mount command, we can check the mounted File System using fdisk -l command.


After extracting the image calculate md5 of the extracted NTFS File System image for integrity purposes.


Extracting the File System from the image


-b partition sizes in bytes
-r Recurse into DOS partitions and look for other partition tables.
-v verbose